In this tutorial, we’ll be building a Weather app in Svelte. The app features a 5-day forecast as well as an interactive city search. Our app is going to make an HTTP call to the DarkSky API to retrieve data. It will take advantage of the Algolia Places API for autocompleting a city input.
Check out the finished project on github: https://github.com/babycourageous/svelte-netlify-weather-app
Check out the live app on Netlify: https://svelte-darksky.netlify.com/
Initialize A New Svelte Tailwind Project
Use degit to initialize a new Svelte project. This tutorial will use Tailwind for the styles so feel free to pull my starter using the code below:
npx degit babycourageous/svelte-tailwind-starter svelte-netlify-weather-appIf you wish to go with a default install of Svelte then the official pipeline is the way to go:
npx degit sveltejs/template svelte-netlify-weather-appThis project will use npm as the package manager so install the dependencies:
npm iCustom Forms With Tailwind
Tailwind doesn't come with any default form styling so inputs, selects, checkboxes, and radios look awful. We will install the Tailwind Custom Forms plugin:
npm install @tailwindcss/custom-forms --save-devNext in the tailwind.config.js file add it to the plugins section:
tailwind.config.js
module.exports = {
  // ...
  plugins: [require('@tailwindcss/custom-forms')],
}
Initial App Layout
Replace the code in main.js with the following:
main.js
import App from './App.svelte'
import './tailwind.css'

const app = new App({
  target: document.body,
})

export default app
All this does is remove the name prop from being passed into the App. Then copy and paste the code below into App.svelte to set up the initial skeleton for the app.
App.svelte
<script>
  let daily = [1, 2, 3, 4, 5]
</script>

<main class="flex justify-center pt-8">
  <div class="mb-8 text-white">
    <input
      id="search"
      type="text"
      class="form-input block w-full text-gray-800"
    />
    <div
      class="mt-4 w-128 max-w-lg font-sans overflow-hidden bg-gray-900
      rounded-lg shadow-lg"
    >
      <div class="flex items-center justify-between px-6 py-8">
        <div class="flex items-center">
          <div>
            <div class="text-6xl font-semibold">8°C</div>
            <div>Feels like 2°C</div>
          </div>
          <div class="mx-5">
            <div class="font-semibold">Cloudy</div>
            <div>Toronto, Canada</div>
          </div>
        </div>
        <div>ICON</div>
      </div>

      <div class="text-sm bg-gray-800 overflow-hidden">
        {#each daily as item, index}
          <div
            class="flex items-center px-6 py-4"
            class:bg-gray-700={index % 2}
          >
            <div class="w-1/6 text-lg text-gray-200">DOW : {item}</div>
            <div class="flex items-center w-2/3 px-4">
              <div>ICON</div>
              <div class="ml-3">Cloudy with a chance of showers</div>
            </div>
            <div class="w-1/6 text-right">
              <div>5°C</div>
              <div>-2°C</div>
            </div>
          </div>
        {/each}
      </div>
    </div>
  </div>
</main>
Sign up for a Darksky account
Visit Dark Sky and register for a free account. Once you register you will be able to get an API key to use for the app.
In the account settings you will be able to access the secret API key. This key grants you access to the Dark Sky API. You must supply the secret in all API requests.
However since the key is secret we don't want to expose it on the client. In order to make requests without involving a backend we will use Netlify and Netlify Functions.
Initialize A Netlify Project
In case you've never used it, Netlify is an all-in-one platform for web projects. It can replace hosting infrastructure, continuous integration, and deployment pipelines with a single workflow. In addition serverless functions, user authentication, and form handling can all be added too!
Install Netlify CLI
The Netlify CLI will let us deploy this app to be hosted on Netlify straight from the command line.
npm install netlify-cli -gEven if you already have the Netlify CLI, run the above command to update to the latest release to take advantage of some of the features we need to use.
If you don't have an account with Netlify already - sign up for a Netlify account. It's free and Netlify is an awesome resource to have for projects.
Create and Connect a Netlify site. We'll connect manually rather than via github repo. If you would like to integrate a continuous deployment via GitHub, the Netlify docs do a great job explaining how to set that up.
netlify initSet up Netlify configuration
In the root of the project create a netlify.toml file. This file holds all the settings Netlify will use to build and develop the app. Add the following build settings to that file
netlify.toml
[build]
  # Directory (relative to root of your repo) that contains the deploy-ready
  # HTML files and assets generated by the build. If a base directory has
  # been specified, include it in the publish directory path.
  publish = "public/"

  # Default build command.
  command = "npm run build"

  # Directory with the serverless Lambda functions to deploy to AWS.
  functions = "src/functions/"
Next add the following development settings below the build settings.
netlify.toml
[dev]
  command = "npm run dev" # Command to start your dev server
  publish = "public" # If you use a _redirect file, provide the path to your static content folder
Test it out
netlify devor
ntl devShould call npm run dev and serve the Svelte app at http://localhost:8888.
Under the hood Netlify is doing a bunch of cool stuff to allow the proxying of Netlify functions to the localhost for testing!
Fetch weather in app
Every Svelte component has a lifecycle that starts when it is created, and ends when it is destroyed. There are a handful of functions that allow you to run code at key moments during that lifecycle. We will use onMount - which runs after the component is first rendered to the DOM - to fetch our data.
It's recommended to put the fetch in onMount rather than at the top level of the <script> because of server-side rendering (SSR).
Inside the App.svelte file import the onMount hook, create a function called fetchData and call it when the component mounts:
App.svelte
<script>
import { onMount } from 'svelte'
let daily = [1, 2, 3, 4, 5]
async function fetchData() {
const response = await fetch(
`https://api.darksky.net/forecast/YOUR_DARKSKY_API_KEY/37.8267,-122.4233`
)
const data = await response.json()
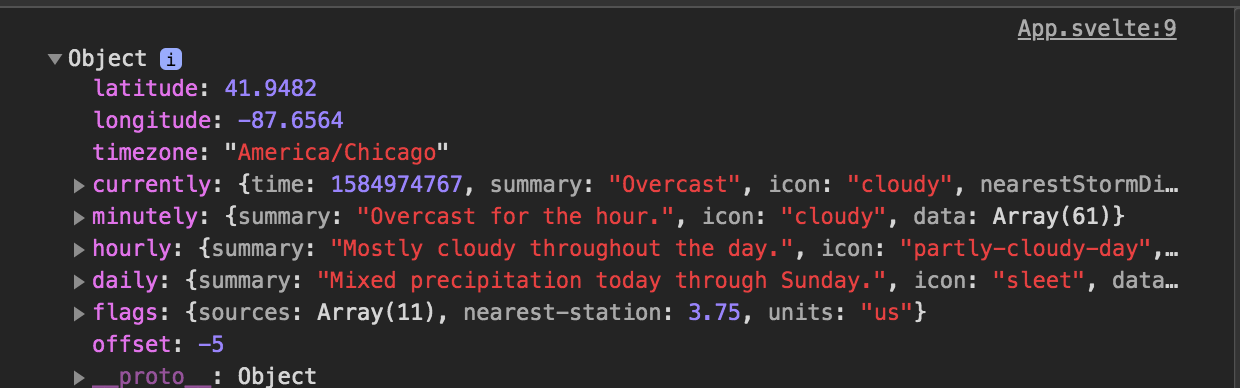
console.log(data)
}
onMount(() => {
fetchData()
})
</script>
If you open up the console you should see the dreaded CORS error. Since our API key is secret and we don't want other domains using it, DarkSky has CORS enabled and we must call the function from a server. But spinning up a server or hosting this just to make an API call is more trouble than it's worth. That's where Netlify comes in!
Proxy that API with Netlify
We need to proxy our API call in order to avoid that dreaded CORS error. We also want to get that secret API key off our client and hidden from prying eyes. Luckily, Netlify Functions is the perfect tool for the job!
We will create a serverless function and then call that instead of the API directly in the fetchData function.
Add Serverless Function
Inside the src directory create a folder called functions. This corresponds to the setting in our netlify.toml from earlier.
Next we will scaffold a function using the Netlify CLI.
ntl functions:createPick the template node-fetch and give it the name dark-sky when the CLI asks.
Inside that newly created folder open the dark-sky.js file and replace the code with the following:
functions/dark-sky/dark-sky.js
/* eslint-disable */
const fetch = require('node-fetch')

exports.handler = async function(event, context) {
  const API_URL = 'https://api.darksky.net/forecast'

  const DARKSKY_URL = `${API_URL}/YOUR_DARKSKY_API_KEY/41.9482,-87.6564`

  try {
    const response = await fetch(DARKSKY_URL, {
      headers: { Accept: 'application/json' },
    })

    if (!response.ok) {
      // NOT res.status >= 200 && res.status < 300
      return { statusCode: response.status, body: response.statusText }
    }

    const data = await response.json()

    return {
      statusCode: 200,
      body: JSON.stringify(data),
    }
  } catch (err) {
    console.log(err) // output to netlify function log
    return {
      statusCode: 500,
      body: JSON.stringify({ msg: err.message }), // Could be a custom message or object i.e. JSON.stringify(err)
    }
  }
}
For now just hard-code your API key into the function, we'll put this in an environment variable momentarily.
Now in our app, replace the fetchData call to the DarkSky API with this lambda function instead.
App.svelte
async function fetchData() {
  const response = await fetch(`/.netlify/functions/dark-sky`)
  const data = await response.json()
  console.log(data)
}
SUCCESS! If all went well you should see the API data returned in the console.
Expand on the serverless API
Now we're gonna make the API a little more dynamic.
Move the API Key to Netlify environment.
Go to the Netlify admin and within the settings scroll to the Environment section.

Add a new variable called DARKSKY_API_KEY and put your key as the value. This will now be available on process.env within our lambda.
Move API variables to the component state
Just below our onMount import is where we will define all our component state. We will move our location coordinates into a location object.
App.svelte
let location = {
  name: 'Chicago, Illonois',
  lat: 41.9482,
  lng: -87.6564,
}
Now we can pass those coordinates into the fetchData call as part of a query string.
App.svelte
async function fetchData() {
  const response = await fetch(
    `/.netlify/functions/dark-sky?lat=${location.lat}&lng=${location.lng}`
  )
  const data = await response.json()
  console.log(data)
}
Update lambda function
Inside the lambda function we need to pull those values from our query string. Netlify provides these variables inside the queryStringParameters property of the function event.
Update the variable declarations above the try block:
src/functions/dark-sky.js
const API_URL = 'https://api.darksky.net/forecast'

// pull lat and lng params out of query string
const { lat, lng } = event.queryStringParameters

// Get env var values defined in our Netlify site UI
const { DARKSKY_API_KEY } = process.env

const DARKSKY_URL = `${API_URL}/${DARKSKY_API_KEY}/${lat},${lng}`
Now visit http://localhost:8888
You should still see the console log our response object!
Create an api redirect
Let's be honest, ./netlify/functions/weather is an ugly endpoint for an API. It would be nice to have a clean URL like /api/weather that redirects to that endpoint. Well, Netlify does it again! We can use Netlify Redirects to accomplish this. Let's update our settings. Add the following to the bottim of our Netlify config:
netlify.toml
[[redirects]]
  from = "/api/weather/*"
  to = "/.netlify/functions/dark-sky/:splat"
  query = {lat = ":lat", lng = ":lng"}
  status = 200
  force = true
Now we can hit localhost:8888/api/weather instead of localhost:8888/.netlify/functions/dark-sky. This isn't a necessary step, it just makes URLs a little easier when dealing with our own API.
Below is the updated fetchData function:
App.svelte
async function fetchData() {
  const response = await fetch(`/api/weather?lat=${location.lat}&lng=${location.lng}`)
  const data = await response.json()
  console.log(data)
}
Using the result
Now it's time to display some of the weather data we pulled. Begin by defining some more state just above the location state definition:
App.svelte
let currentTemp = {
  actual: '',
  feels: '',
  summary: '',
  icon: '',
}
Inside fetchData replace the console.log with assignments to the state variables. In Svelte, assignments to a locally declared variable are reactive and result in a re-render.
App.svelte
async function fetchData() {
  const response = await fetch(`/api/weather?lat=${location.lat}&lng=${location.lng}`)
  const data = await response.json()

  const { temperature, apparentTemperature, summary, icon } = data.currently
  currentTemp.actual = Math.round(temperature)
  currentTemp.feels = Math.round(apparentTemperature)
  currentTemp.summary = summary
  currentTemp.icon = icon
}
Now use these variables in our markup:
App.svelte
<main class="flex justify-center pt-8">

  ...

    <div
      class="mt-4 w-128 max-w-lg font-sans overflow-hidden
      bg-gray-900 rounded-lg shadow-lg"
    >
      <div class="flex items-center justify-between px-6 py-8">
        <div class="flex items-center">
          <div>
            <div class="text-6xl font-semibold">{currentTemp.actual}°C</div>
            <div>Feels like {currentTemp.feels}°C</div>
          </div>
          <div class="mx-5">
            <div class="font-semibold">{currentTemp.summary}</div>
            <div>{location.name}</div>
          </div>
        </div>
        <div>ICON</div>
      </div>

      ...

    </div>
  </div>
</main>
Now you should see the initial state data displayed in the app.
Adding Animated Icons
DarkSky uses an icon set called Skycons to display little animations representing the weather. Rather than pull down the library, we'll just link to the cdnjs file.
Connecting Skycons to our app
Add the following just below the <script> tag in our App.svelte file.
App.svelte
<svelte:head><script src="https://cdnjs.cloudflare.com/ajax/libs/skycons/1396634940/skycons.min.js" on:load={initializeSkycons}></script></svelte:head>The <svelte:head> element inserts elements inside the <head> of the document. Since The <script> tag (and everything else in svelte:head) is added programmatically, we must wait until they are loaded before using the respective code. There are a few ways to do this - notably adding the script tags manually or adding an onload handler. Above we use an onload that will initialize Skycons once ready.
Add a variable with the rest of our state declarations for the Skycons initialization as well as the initializeSkycons function just above fetchData:
App.svelte
<script>
import {onMount} from 'svelte'

let skycons

...

function initializeSkycons() {
  skycons = new Skycons({ color: 'white' })
}

async function fetchData() {
  ...
}
</script>
Next, inside the markup replace the placeholder ICON text with a canvas element. The id attribute of the canvas element is what Skycons uses to load its animated icons.
App.svelte
<main>
...
<div class="current-weather flex items-center justify-between px-6 py-8">
<div class="flex items-center">
<div>
<div class="text-6xl font-semibold">8°C</div>
<div>Feels like 2°C</div>
</div>
<div class="mx-5">
<div class="font-semibold">Cloudy</div>
<div>Toronto, Canada</div>
</div>
</div>
<div><canvas id="iconCurrent" width="96" height="96"></canvas></div>
</div>
...
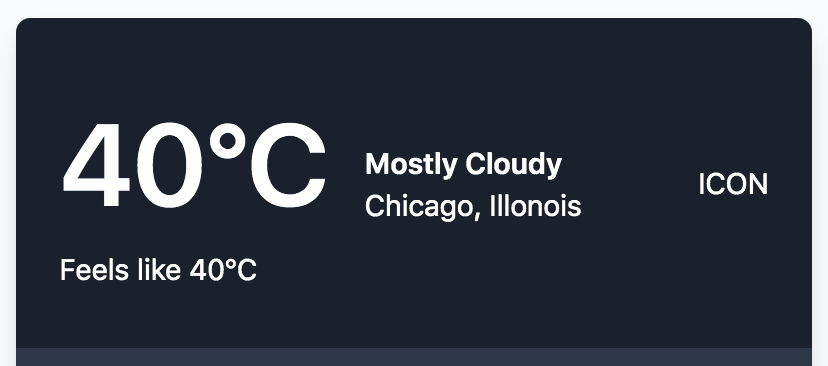
</main>Then update the fetchData function to add and animate a weather icon. Let's just hard-code one in to see how this works:
App.svelte
<script>

...

  async function fetchData() {
    const response = await fetch(
      `/api/weather?lat=${location.lat}&lng=${location.lng}`
    )
    const data = await response.json()

    const { temperature, apparentTemperature, summary, icon } = data.currently
    currentTemp.actual = Math.round(temperature)
    currentTemp.feels = Math.round(apparentTemperature)
    currentTemp.summary = summary
    currentTemp.icon = icon

    skycons.add('iconCurrent', 'partly-cloudy-day')
    skycons.play()
  }

</script>
That should render an animated partly cloudy icon in the canvas element.
Using dynamic icon data
The DarkSky API returns the icon name with spaces but the Skycons library expects an icon string that is hyphenated. So we'll create a simple hyphenate utility function to assist with that.
App.svelte
function hyphenate(str) {
  return str.split(' ').join('-')
}

async function fetchData() {
  const response = await fetch(`/api/weather?lat=${location.lat}&lng=${location.lng}`)
  const data = await response.json()

  const { temperature, apparentTemperature, summary, icon } = data.currently
  currentTemp.actual = Math.round(temperature)
  currentTemp.feels = Math.round(apparentTemperature)
  currentTemp.summary = summary
  currentTemp.icon = hyphenate(icon)

  skycons.add('iconCurrent', currentTemp.icon)
  skycons.play()
}
The hyphenate function could also use a regular expression if preffered:
App.svelte
function hyphenate(str) {
  return str.replace(/\s/g, '-')
}
The Week Ahead
The JSON object that the DarkSky API returns contains a "daily" key that has weather info for the next 8 days. We'll filter that to a 5-day forecast and use it to populate the 5-day forecast below the main current temp area.
Update our placeholder daily array with an empty array that will hold our daily forecast:
App.svelte
let daily = []Once the API resolves we can filter the result down to five days and store it in the daily array. Update our fetchData function:
App.svelte
  async function fetchData() {
    const response = await fetch(
      `/api/weather?lat=${location.lat}&lng=${location.lng}`
    )
    const data = await response.json()

    const { temperature, apparentTemperature, summary, icon } = data.currently
    currentTemp.actual = Math.round(temperature)
    currentTemp.feels = Math.round(apparentTemperature)
    currentTemp.summary = summary
    currentTemp.icon = hyphenate(icon)

    daily = data.daily.data.filter((day, index) => index < 5)

    skycons.add("iconCurrent", currentTemp.icon)
    skycons.play()
  })
}
The API returns a UNIX timestamp for each day. In order to display the day of the week we'll create another helper function using the native javascript Date object (rather than reaching for an external date library). If this was more complex or we had more date calculations to make perhaps a library like moment or datefns would be necessary.
Add the following below our hyphenate function:
App.svelte
<script>
...

function convertToDay(unix) {
  const newDate = new Date(unix * 1000)
  const days = ['SUN','MON','TUE','WED','THU','FRI','SAT']

  return days[newDate.getDay()]
}
...
</script>
The function simply creates a new Date based on the UNIX timestamp passed in. Then since Date.getDay returns an index we use an array of day of the week abbreviations that will correspond to the index returned.
Simple as that.
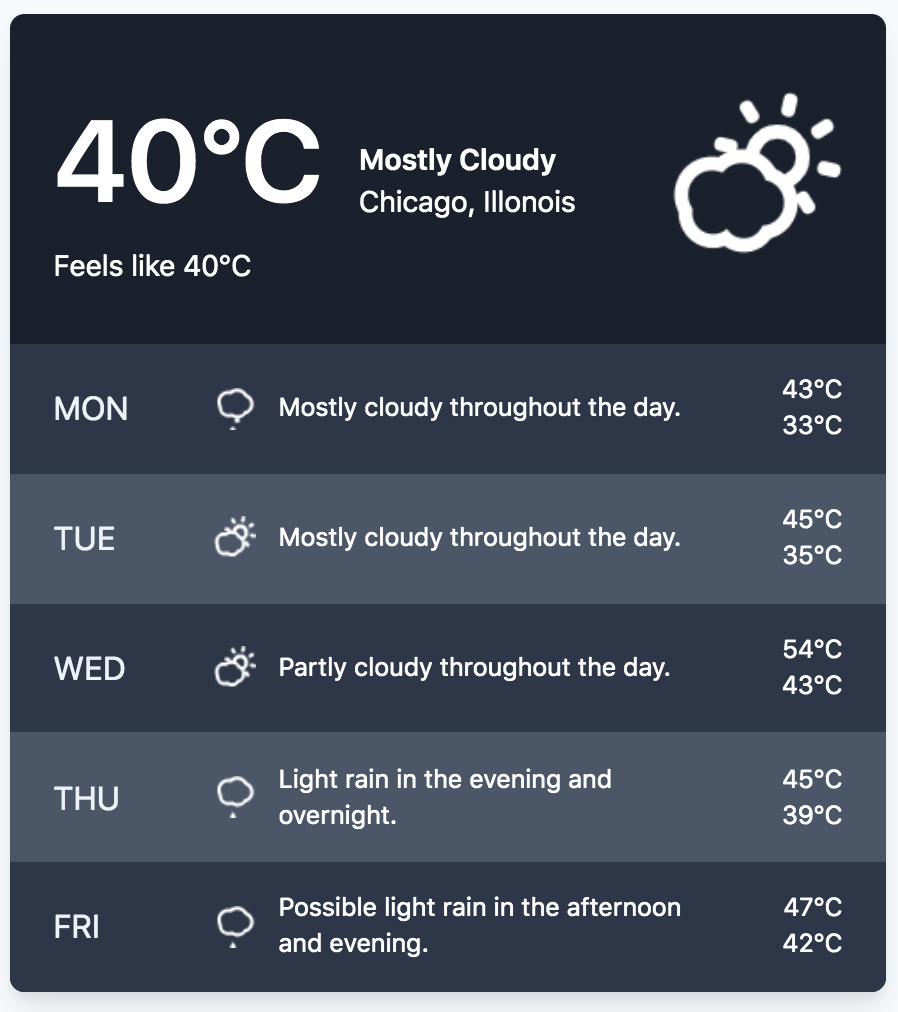
In the markup loop over each day and use the result to populate our daily forecast. In this case we will destructure our day inside the #each expression. We'll also make use of the provided index for our icon ids as well as use the time property of each day as the key to uniquely identify each item.
App.svelte
  <div class="future text-sm bg-gray-800 px-6 py-8 overflow-hidden o-8">
    {#each daily as {time, icon,summary, temperatureHigh, temperatureLow}, index (time)}
      <div class="flex items-center">
        <div class="w-1/6 text-lg text-gray-200">{convertToDay(time)}</div>
        <div class="flex items-center w-2/3 px-4">
          <div><canvas id={`icon-week-${index+1}`} data-icon={hyphenate(icon)} width=24 height=24></canvas></div>
          <div class="ml-3">{summary}</div>
        </div>
        <div class="w-1/6 text-right">
          <div>{Math.round(temperatureHigh)}°C</div>
          <div>{Math.round(temperatureLow)}°C</div>
        </div>
      </div>
    {/each}
  </div>
Each of the icons in the daily forecast has a data-icon attribute that holds a reference to the icon string. We can use that along with the id to add a Skycon for each day.
We'll make use of Svelte's tick function. The tick function can be called anytime - not just when the component first initialises. It returns a promise that resolves as soon as any pending state changes have been applied to the DOM (or immediately, if there are no pending state changes).
This will be helpful since we need to reference the DOM elements for the daily forecast AFTER the updates to the state that create them.
App.js
<script>
  import { onMount, tick } from 'svelte'

  ...

  async function fetchData() {
    const response = await fetch(
      `/api/weather?lat=${location.lat}&lng=${location.lng}`
    )
    const data = await response.json()

    const { temperature, apparentTemperature, summary, icon } = data.currently
    currentTemp.actual = Math.round(temperature)
    currentTemp.feels = Math.round(apparentTemperature)
    currentTemp.summary = summary
    currentTemp.icon = hyphenate(icon)

    daily = data.daily.data.filter((day, index) => index < 5)

    skycons.add('iconCurrent', currentTemp.icon)

    await tick()

    daily.forEach((day, index) => {
      const iconID = `icon-week-${index + 1}`
      skycons.add(
        iconID,
        document.getElementById(iconID).getAttribute('data-icon')
      )
    })
    skycons.play()
  }

...

</script>
Once the state is updated a forEach loop is used to create the five Skycons for the daily forecast.
Integrate Algolia Places API
Now let's tackle being able to search for cities in our app. To do this we will use Algolia Places API. Sign up for APP ID and API KEY. These keys are public and totally ok to expose on client.
You'll find the Application ID and Search-Only API Key in your dashboard under API Keys.
Initialize Places in our app
Same as before - initialize this in svelte:head with an on:load and add the corresponding initialization function below initializeIcons along with the variable to hold the initialized result.
App.svelte
<script>
  import { onMount, tick } from 'svelte'

  let skycons
  let placesAutocomplete

...

  function initPlaces() {
    placesAutocomplete = places({
      appId: 'pl000XLR3KOB',
      apiKey: 'be931dd1c86b72dae51db881ff15f04b',
      container: document.querySelector('#search'),
    }).configure({ type: 'city' })
  }

  ...

</script>

<svelte:head>
  <script
    src="https://cdnjs.cloudflare.com/ajax/libs/skycons/1396634940/skycons.min.js"
    on:load={initializeSkycons}>

  </script>
  <script
    src="https://cdn.jsdelivr.net/npm/places.js@1.18.1"
    on:load={initPlaces}>

  </script>
</svelte:head>
The above initPlaces function initializes the Places autocomplete input to our search input to only display cities.
Because of how Tailwind resets some styles we need to add some Places specific style overrides in order to display the search component properly. In Svelte styles are encapsulated with the component. Since the Places HTML is added after that we have to apply styles to the selectors globally using the :global(...) modifier.
Place the following at the bottom of the file:
App.js
<style type="text/postcss">
  :global([type='search']::-webkit-search-cancel-button),
  :global([type='search']::-webkit-search-decoration) {
    -webkit-appearance: none;
  }

  :global([type='search']::-ms-clear) {
    display: none;
  }
  :global(.ap-suggestion) {
    @apply text-gray-700;
  }

  :global(.ap-address) {
    @apply text-gray-700;
  }
  :global(.ap-suggestion-icon svg) {
    @apply inline-block;
    @apply -mt-3;
  }
  :global(.ap-footer svg) {
    display: inline;
  }
</style>
Next update the markup for our input element:
App.js
  <main>

...

    <input
      id="search"
      type="search"
      class="form-input block w-full text-gray-800"
    />
    <p class="mt-4 text-gray-800 text-center">{location.name}</p>

...

  </main>
Update app when location changes
Currently nothing happens when we select a place via the input. We'll wire up a Places change handler and use that to fetch the data on location change.
App.svelte
<script>
  function initPlaces() {
    ...

    placesAutocomplete.on('change', function(e) {
      location = {
        name: `${e.suggestion.name}, ${e.suggestion.country}`,
        ...e.suggestion.latlng,
      }
    })
  }
</script>
That won't be enough. We have to trigger our app to re-fetch the data when the location changes. For that we will use a Svelte reactive declaration.
App.svelte
<script>
...

  let daily = []

  $: fetchData(location.lat, location.lng)

...
</script>
Now our fetchData function will run anytime the location.lat or location.lng change.
With that our Weather App is finished.
Check out the finished project on github: https://github.com/babycourageous/svelte-netlify-weather-app
Check out the live app on Netlify: https://svelte-darksky.netlify.com/