We're going to build a simple currenc converter using Svelte and the ExchangeRates API.
Check out the repo: https://github.com/babycourageous/svelte-currency-converter
Check out the finished project: https://svelte-convert-currency.netlify.com/
Initialize Project
Let's get a Svelte project started. The official default starter project is installed using degit:
npx degit sveltejs/template svelte-currency-converterI have my own starter as well that uses Tailwind CSS along with some other configurations.
npx degit babycourageous/svelte-tailwind-starter svelte-currency-converterSince I'm styling with Tailwind, I'll go ahead and start with my personal starter. Feel free to go with the default install if you prefer to roll with your own traditional styles. That's really the only difference.
Now let's remove some of the default nonsense.
First remove the props property from the App declaration in main.js
main.js
import App from './App.svelte'

const app = new App({
  target: document.body,
})

export default app
Next lets clean Up App.svelte by doing the following:
- Remove prop export
- Remove default styles
- Simplify Markup
App.svelte
<script>

</script>

<main>
	<h1>Currency Converter</h1>
</main>

<style>

</style>
Quick Default Markup and Styles
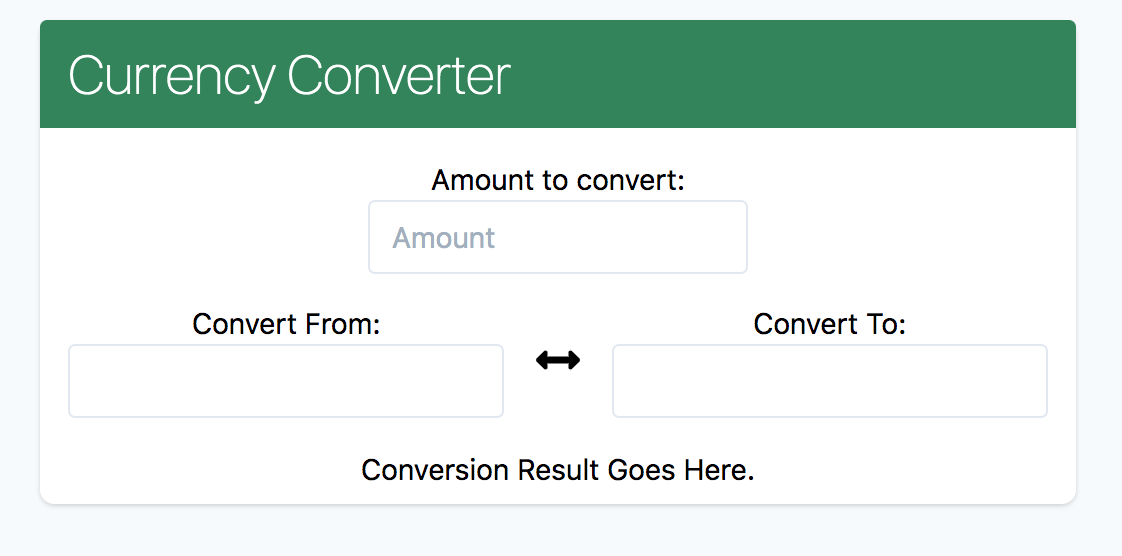
Let's set up a quick proof of concept. Nothing more than some HTML and styles.
The Markup
We'll use the HTML <dataset> tag to specify a list of pre-defined options for an <input> element. Using a <dataset> tag will provide an "autocomplete" feature on its parent <input> element. Pretty fancy stuff for just regular HTML!
<main class="flex items-center justify-center">
  <div
    class="flex flex-col w-full rounded-lg shadow bg-white sm:w-1/2 lg:max-w-xl"
  >
    <h1
      class="m-0 py-2 px-4 font-thin text-3xl text-white bg-green-700 rounded-t"
    >
      Currency Converter
    </h1>
    <div class="flex flex-col items-center justify-center w-full pt-4">
      <label for="amountToConvert">Amount to convert:</label>
      <input
        id="amountToConvert"
        class="block py-2 px-3 leading-6 border border-gray-300 rounded"
        name="amountToConvert"
        type="number"
        min="0"
        placeholder="Amount"
      />
    </div>

    <div class="flex items-center w-full h-full py-4 text-center">
      <div class="flex flex-col items-center w-3/5 px-4 sm:w-full">
        <label for="fromCurrency">Convert From:</label>
        <input
          id="fromCurrency"
          class="block w-full py-2 px-3 leading-6 border border-gray-300 rounded"
          name="fromCurrency"
          maxlength="3"
          list="fromCurrencyList"
        />
        <datalist id="fromCurrencyList">
          <option>1</option>
          <option>2</option>
          <option>3</option>
        </datalist>
      </div>

      <button
        class="flex items-center justify-center m-0 bg-transparent border-2
        border-transparent pointer focus:border-gray-300"
      >
        <svg
          class="w-6 h-6"
          xmlns="http://www.w3.org/2000/svg"
          viewBox="0 0 512 512"
        >
          <path
            d="M377.941
            169.941V216H134.059v-46.059c0-21.382-25.851-32.09-40.971-16.971L7.029
            239.029c-9.373 9.373-9.373 24.568 0 33.941l86.059 86.059c15.119
            15.119 40.971 4.411 40.971-16.971V296h243.882v46.059c0 21.382 25.851
            32.09 40.971 16.971l86.059-86.059c9.373-9.373 9.373-24.568
            0-33.941l-86.059-86.059c-15.119-15.12-40.971-4.412-40.971 16.97z"
          />
        </svg>
      </button>

      <div class="flex flex-col items-center w-3/5 px-4 sm:w-full">
        <label for="toCurrency">Convert To:</label>
        <input
          id="toCurrency"
          class="block w-full py-2 px-3 leading-6 border border-gray-300 rounded"
          name="toCurrency"
          maxlength="3"
          list="toCurrencyList"
        />
        <datalist id="toCurrencyList">
          <option>1</option>
          <option>2</option>
          <option>3</option>
        </datalist>
      </div>
    </div>

    <div class="flex flex-wrap justify-center w-full pb-2">
      <p>Conversion Result Goes Here.</p>
    </div>

  </div>
</main>
The Global Styles
Next let's define some default global styles.
<style>
  :global(body) {
    padding-top: 2rem;
    background-color: #fafafa;
  }
</style>
In Svelte, styles are scoped to the component. This means that any non-component styles (such as you might have in a global.css file) will not apply to the element. To apply styles to a selector globally, we use the :global(...) modifier.

Updating the datalist with real data
The list of currencies will be fetched using exchangerates API. The values received will be used to populate the datalist elements.
Fetch the Exchange Rates
Every Svelte component has a lifecycle that starts when it is created, and ends when it is destroyed. There are a handful of functions that allow you to run code at key moments during that lifecycle. We are going to use the onMount lifecycle to fetch our data.
The onMount function schedules a callback to run as soon as the component has been mounted to the DOM. Inside the script tag add the following code:
App.svelte
<script>
  import { onMount } from "svelte";

  const BASE_URL = "https://api.exchangeratesapi.io/latest";

  let from = "EUR";

  onMount(async () => {
    const res = await fetch(`${BASE_URL}?base=${from}`);
    const data = await res.json()
    console.log(data)
})
</script>
Before we fetch our data we create a BASE_URL constant and declare some reactive state by defining variables with let. In Svelte, assignments are reactive so whenever we assign a new value to a variable used in a component it re-renders.
If you check the console in your browser you should see some rates logged.

Populate Datalist
We are going to store our rates in a variable. Then that currencies variable can be used on our dataset elements. In our script tag, initialize currencies to empty array. Once the data loads, we populate it and sort it alphabetically.
<script>
  import { onMount } from "svelte";

  const BASE_URL = "https://api.exchangeratesapi.io/latest";

  let currencies = []
  let from = 'EUR'

  onMount(async () => {
    const res = await fetch(`${BASE_URL}?base=${from}`);
    const data = await res.json();

    currencies = [from, ...Object.keys(data.rates)].sort();
  });
</script>
Now we can use the currencies array in our markup. Using Svelte's #each directive we can loop through the array of currencies and create an <option> element for each item in the currencies array.
Replace each <input>/<dataset> groups with the following:
<input
  id="fromCurrency"
  name="fromCurrency"
  maxlength="3"
  list="fromCurrencyList" />
<datalist id="fromCurrencyList">
  {#each currencies as option}
    <option>{option}</option>
  {/each}
</datalist>

...

<input
  id="toCurrency"
  name="toCurrency"
  class="currency-input"
  maxlength="3"
  list="toCurrencyList" />
<datalist id="toCurrencyList">
  {#each currencies as option}
    <option>{option}</option>
  {/each}
</datalist>
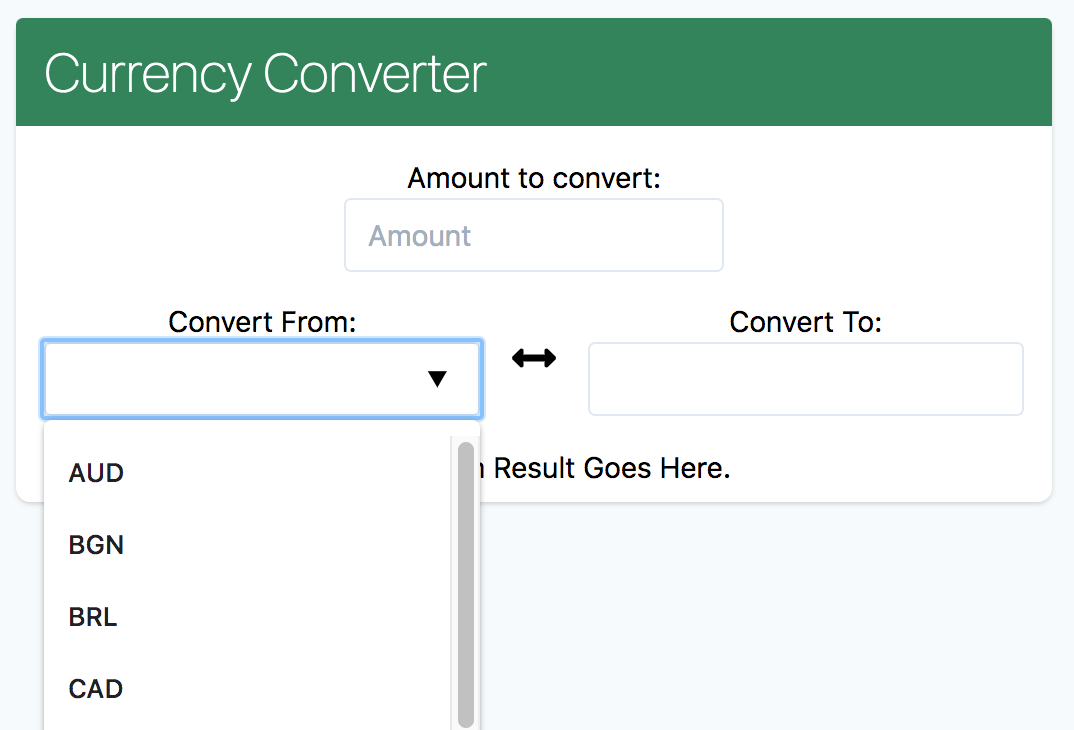
If you select the input you should see the populated list of currencies.

Set Defaults
Now, to set some more defaults for the input and dataset selections. Define variables to hold the default value of the <input> amount as well as the to value for the other <dataset>.
App.svelte
<script>
...

  let currencies = []
  let amount = 1
  let from = 'EUR'
  let to = 'USD'

  ...
</script>
For the main input element we will use the bind:value directive to create two-way binding with our amount variable. This means that not only will changes to the value of the amount variable update the input value, but changes to the input value will update amount.
App.svelte
<main>
...

  <div class="flex flex-col items-center justify-center w-full pt-4">
    <label for="amountToConvert">Amount to convert:</label>
    <input
      id="amountToConvert"
      class="block py-2 px-3 leading-6 border border-gray-300 rounded"
      name="amountToConvert"
      type="number"
      min="0"
      placeholder="Amount"
      bind:value={amount} />
  </div>

    ...
</main>
We aren't going to use bind:value with the datalist elements because we need to perform some checks with those inputs. Namely since our currency codes are uppercase making sure the inputs are uppercase when entering text.
While we are at it we will bind a focus event that will select the entire datalist input when we focus it.
<script>
  ...

  function handleFocus() {
    this.select()
  }

  function handleInput(e) {
    if (e.target.name === "fromCurrency") {
      from = e.target.value.toUpperCase();
    } else {
      to = e.target.value.toUpperCase();
    }
  }

  function onMount(() => {
    ...
  })
</script>

<style>
...
</style>

<main>
...

  <input
    id="fromCurrency"
    class="block w-full py-2 px-3 leading-6 border border-gray-300 rounded"
    name="fromCurrency"
    maxlength="3"
    value={from}
    on:input={handleInput}
    on:focus={handleFocus}
    list="fromCurrencyList"
  />
  <datalist id="fromCurrencyList">
    {#each currencies as option}
      <option>{option}</option>
    {/each}
  </datalist>

...

  <input
    id="toCurrency"
    class="block w-full py-2 px-3 leading-6 border border-gray-300 rounded"
    name="toCurrency"
    maxlength="3"
    value={to}
    on:input={handleInput}
    on:focus={handleFocus}
    list="toCurrencyList"
  />
  <datalist id="toCurrencyList">
    {#each currencies as option}
      <option>{option}</option>
    {/each}
  </datalist>

...

</main>
Using the Exchange Rates
We've already used the return data from our onMount function to create our list of currencies. The return data also has all the exchange rates for a default base "from" currency of EUR. Let's wire up that now.
Set Exchange Rates
We are going to store the exchange rates returned in an object aptly called exchangeRates. Later on we will recalculate this list of rates if we need to before we hit the API again. This way we don't have to make an unnecessary fetch call.
We'll also store our current rate in a variable called, you guessed it, currentRate.
Declare the exchangeRates and currentRate variables alongside our other variables and then populate them in the onMount function.
App.svelte
<script>
  ...

  let currencies = [];
  let amount = 1;
  let from = "EUR";
  let to = "USD";
  let exchangeRates = {};
  let currentRate = 0;

  ...

  onMount(async () => {
    const res = await fetch(`${BASE_URL}?base=${from}`);
    const data = await res.json();

    currencies = [from, ...Object.keys(data.rates)].sort();
    exchangeRates = { ...data.rates, [from]: 1 };
    currentRate = exchangeRates[to];
  });

  ...
</script>
Calculate and Display Currency Conversion
We'll use a computed property or as Svelte calls them reactive statement to hold our calculated amount. In Svelte, $: allows us to run statements reactively. Reactive statements run immediately before the component updates, whenever the values that they depend on have changed.
In our case we will calculate the currency conversion whenever the amount or currentRatechange.
Add the following below our other variable declarations:
App.svelte
$: convertedAmount = (amount * currentRate).toFixed(3);Then we will update the placeholder text at the bottom of our markdown. This will check that our amount, from, or to variables aren't undefined before displaying our conversion result.
App.svelte
<main>

...

  <div class="flex flex-wrap justify-center w-full pb-2">
    {#if amount === undefined || from === undefined || to === undefined}
      <p>Please enter a valid amount.</p>
    {:else}
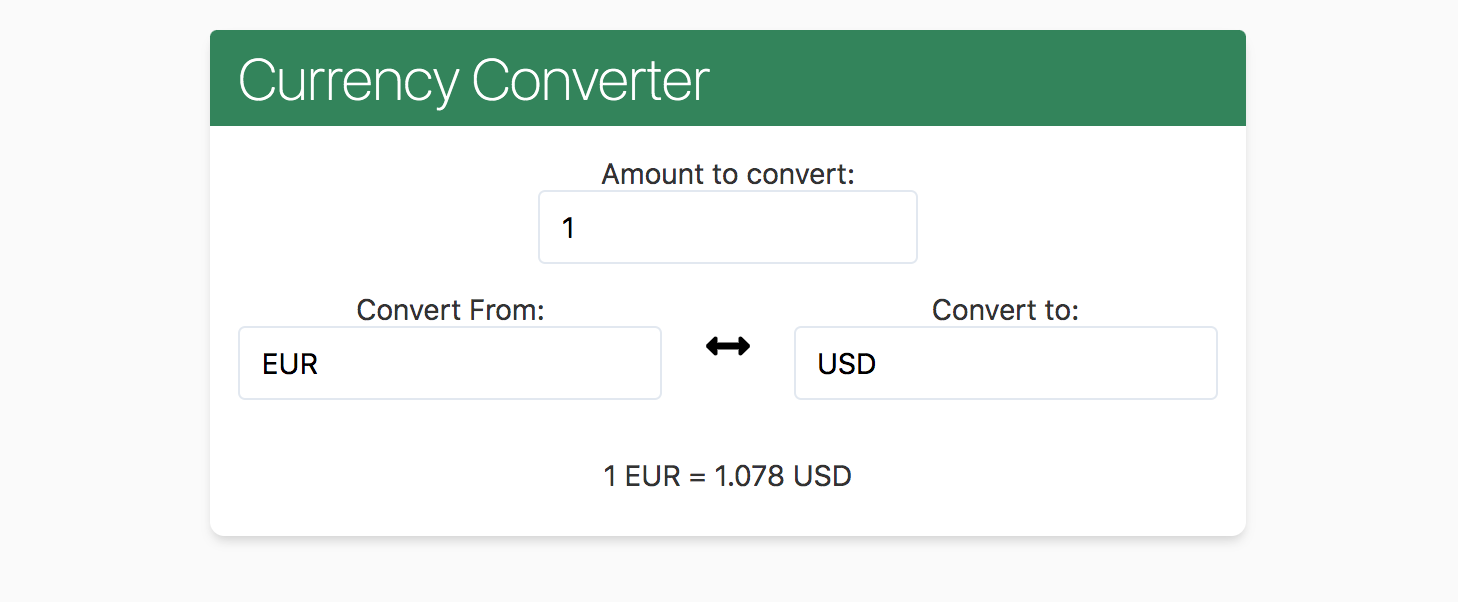
      <p>{amount} {from} = {convertedAmount} {to}</p>
    {/if}
  </div>

...

</main>
Swapping and Recalculating Rates
Now that we have our rates for the default currencies we can add the functionality to switch our currency inputs. We'll also add the functionality to pull a new rate from our exchangeRates object or fetch new rates when we update the currency inputs.
Flipping Currencies
Let's start with adding the ability to switch our from and to currency inputs when we click the double arrow button between them. This is one of the reasons we stored the fetched rates. We'll keep track of each time we flip our from and to currencies and recalculate our rates accordingly. There's no need to make a network request!
First add the following declaration with the rest of the variables:
App.svelte
<script>

...
let isFlipped = false
...

</script>
We initialize to false since at the start our currencies are in their original positions. We'll flip the isFlipped boolean each time we swap currencies and update our exchangeRates and currentRate values. Place the following function above our handlers:
App.svetle
  function switchCurrency() {
    isFlipped = !isFlipped;
    [from, to] = [to, from];

    Object.keys(exchangeRates).map(function(key) {
      exchangeRates[key] = 1 / exchangeRates[key];
    });
  currentRate = 1 / currentRate;
}
Then in the markup we call the function in an on:click directive attached to the button.
App.svelte
<main>

...

  <button class="svg-control" on:click={switchCurrency}>
    <svg xmlns="http://www.w3.org/2000/svg" viewBox="0 0 512 512">
      <path
        d="M377.941
        169.941V216H134.059v-46.059c0-21.382-25.851-32.09-40.971-16.971L7.029
        239.029c-9.373 9.373-9.373 24.568 0 33.941l86.059 86.059c15.119
        15.119 40.971 4.411 40.971-16.971V296h243.882v46.059c0 21.382 25.851
        32.09 40.971 16.971l86.059-86.059c9.373-9.373 9.373-24.568
        0-33.941l-86.059-86.059c-15.119-15.12-40.971-4.412-40.971 16.97z" />
    </svg>
  </button>

...

</main>
Since our convertedAmount is reactive it changes when we switch the inputs.
Updating the Current Rate
The final piece of the puzzle is updating currency rates when we change our currency via the inputs. If we haven't switched them, then updates to the to currency should come from the exisiting exchangeRates object. Otherwise we are changing our from base currency and need to fetch a new batch of exchange rates. If they have been switched, then the inverse should be true.
We'll add a function to fetch rates below our switchCurrency function - one for each input. They will be similar in functionality with those slight differences depending on the state of the app.
App.svelte
<script>

...

  async function fetchRates(base, current) {
    isFlipped = false;
    const res = await fetch(`${BASE_URL}?base=${base}`);
    const data = await res.json();

    exchangeRates = data.rates;
    if (base === "EUR") {
      exchangeRates["EUR"] = 1;
    }
    currentRate = data.rates[current];
  }

</script>
This API doesn't include the 1:1 EUR rate if EUR is the base so we check for that and add it manually.
Below that add the two change handler functions:
App.svelte
  function handleFromCurrencyChange(e) {
    if (isFlipped) {
      // pull from existing list
      currentRate = exchangeRates[from];
    } else {
      // fetch new list
      fetchRates(from, to);
    }
  }

  function handleToCurrencyChange(e) {
    if (isFlipped) {
      // fetch new list
      fetchRates(to, from);
    } else {
      // pull from existing list
      currentRate = exchangeRates[to];
    }
  }
As mentioned these do very similar tasks just in inverse ways depening on the input that changed and status of flipped.
Update each input component with the new handlers:
<main>
  ...

  <label for="fromCurrency">Convert From:</label>
    <input
      id="fromCurrency"
      class="block w-full py-2 px-3 leading-6 border border-gray-300 rounded"
      name="fromCurrency"
      maxlength="3"
      value={from}
      on:input={handleInput}
      on:focus={handleFocus}
      on:change={handleFromCurrencyChange}
      list="fromCurrencyList"
    />
  ...

  <label for="toCurrency">Convert To:</label>
    <input
      id="toCurrency"
      class="block w-full py-2 px-3 leading-6 border border-gray-300 rounded"
      name="toCurrency"
      maxlength="3"
      value={to}
      on:input={handleInput}
      on:focus={handleFocus}
      on:change={handleToCurrencyChange}
      list="toCurrencyList"
    />

  ...

</main>
With that our Currency Converter is complete.
